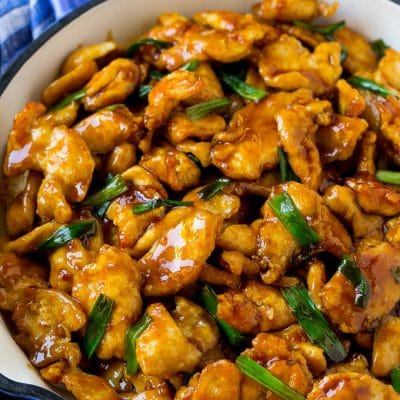
This Mongolian chicken is crispy slices of chicken breast stir fried in a sweet and savory sauce. A restaurant favorite that tastes even better when you make it at home!
I’m a huge fan of Mongolian beef, but I have to say, I think I may like this easy Mongolian chicken even better. The chicken is perfectly crispy on the edges and the sauce has the perfect balance of flavors.


I recently ordered Mongolian chicken at my local Chinese restaurant instead of my go-to Mongolian beef, and boy am I hooked. I decided I needed to learn how to make this dish at home, and it’s been on constant rotation in our house ever since.
How do you make Mongolian chicken?
This recipe starts with thin pieces of chicken breast. I recommend partially freezing your chicken breasts to make them easier to slice. You can cube your chicken if that’s easier, but I think the long thin slices are better because they have more surface area for the sauce to cling to. The chicken is coated in cornstarch and stir fried until crispy.

What is Mongolian sauce made of?
The crispy chicken pieces are coated in Mongolian sauce which is a combination of soy sauce, sesame oil and brown sugar. This dish also gets its flavor from the garlic, ginger and green onions that are added in during the cooking process.

Tips for Mongolian chicken
I keep this dish true to the restaurant version by just including chicken and green onions in the sauce. You can absolutely add more vegetables if you like, some great choices are
- Zucchini
- Water chestnuts
- Sliced carrots
- Broccoli
- Mushrooms
- Red peppers
I typically serve Mongolian chicken over steamed rice, but it’s also great over zucchini noodles or cauliflower rice if you’re looking to watch your carbs. If you’re not watching your carbs, try it with a side of chow mein.

If you’re not a fan of chicken breast, feel free to use chicken thighs in this dish. Or try something completely different and use shrimp instead of chicken, I’ve done that before and it’s fabulous. Regardless of how you choose to serve it, Mongolian chicken is sure to be a hit! My kids like it so much that they even ask to have it for lunch the next day.
More asian dishes you’ll enjoy
- Sweet and Sour Chicken
- Chicken Lettuce Wraps
- Pepper Steak
- Slow Cooker Orange Chicken
- Homemade Egg Rolls
Mongolian Chicken
Ingredients
- 1 1/4 pounds boneless skinless chicken breast thinly sliced
- 1/4 cup + 2 teaspoons cornstarch divided use
- 3 tablespoons vegetable oil
- 1 1/2 teaspoons minced garlic
- 1 teaspoon minced ginger
- 1 teaspoon toasted sesame oil
- 1/2 cup low sodium soy sauce
- 1/3 cup water
- 1/2 cup dark brown sugar
- 1/2 cup green onions cut into 1 inch pieces
- salt and pepper to taste
Instructions
- Place the chicken and 1/4 cup cornstarch in a resealable plastic bag, shake to coat evenly.
- Heat the vegetable oil in a large pan over high heat
- Add the chicken to the pan in a single layer and season to taste with salt and pepper (keeping in mind the sauce has plenty of salt in it!).
- Cook for 3-4 minutes per side or until browned. Cook in multiple batches if needed.
- Remove the chicken from the pan and place on a plate lined with paper towels
- Add the garlic and ginger to the pan and cook for 30 seconds. Add the soy sauce, sesame oil, water and brown sugar to the pan and bring to a simmer.
- Mix the 2 teaspoons of cornstarch with 1 tablespoon of cold water. Add the cornstarch to the sauce and bring to a boil; boil for 30-60 seconds until just thickened.
- Add the chicken and green onions to the pan and toss to coat with the sauce. Serve over rice if desired.


Love your Chinese recipes Sara.
Oh yeah this is sure to please. My family loved this. Next time I will add some fresh broccoli florets at the end. This did not disappoint. Will certainly be making this again.
My family, even the picky one loved this recipe. I added sliced carrots and broccoli that I cooked in the sauce when it was done. I then put the chicken back in the sauce and added a cup of frozen peas that I’d steamed earlier. Quick, and delicious!
I made this tonight for dinner. It was excellent!!!! Thanks! I’m definitely going to start following you. 🙂
I’m making this tonight! I want to reduce sugar as well, so will try that. Also loved the idea of adding veggies, will try shredded carrots. Thanks for posting! Definitely serving with Jasmine rice.
I fixed this tonight. It was fantastic. I do have to admit, I tweek it a bit. I added hoisin and oyster sauce to the base with just a smidge of sweet chili sauce. The flavor changed ever so slightly. I will make this again. I used cooked chicken breast and dipped the pieces in egg and then in cornstarch. Wonderful flavor. I will make this again.
I made this recipe tonight and it was delightful! But I am certainly glad that I read your review beforehand. I, too, added the hoisen and sweet chili sauce and that made all of the difference. I am sure it would have been tasty otherwise, but man, that sweet chili sauce made it out of this world. I will definitely make this recipe again, and I must say…if I was in the mood for take out, this would satisfy that craving. It is a keeper for sure.
How much sweet chili sauce did you add?
How much hoisin, sweet chili and fish sauce did you use?
Did you use a wok or cast iron skillet? Or just a regular sauce pan?
Regular nonstick skillet!
After trying this for the first time,i have made this multiple evenings , very easy to make and delicious!!!! Thanks for sharing!
this was so good! i did half the recipe for my mom and me and we loved it. the cornstarch made the chicken crisp up in a delicious way. the sauce was delectable. i used regular soy sauce instead of low sodium, so i didn’t use salt at all but it still turned out great. make sure to serve with rice, since the sauce it so good. Also, it would be great with broccoli.
Wow! Delicious. Any chance you have tried this in a crockpot before?
I have not, it would work but the chicken will not be crispy!
Tried it last night and, oh boy, it was awesome. I didn’t have corn starch at home so I improvised with Italian polenta mix instead, but next time I’ll make sure to follow it line by line. And yes, there’s going to be a few “next times”!
Great recipe easy to make. I’ll be back for more.
Such a great recipe! My family loved it!
Absolutely delicious!! I’ve made this dish twice now and it’s been a hit! The only adjustment I have to make is cutting the brown sugar down to 2 tablespoons and I could probably cut it down to 1 tablespoon and enjoy it even more. Excellent recipe!
Can I use regular brown sugar instead of dark brown sugar?
Yes that’s fine!
Excellent recipe. Delicious and easy.
I haven’t tried this yet but sounds good. Just wondering if tried it with all those other vegies, would it be a good idea to make more sauce?
You can definitely make more sauce if you like, just double the sauce ingredients!
Made tonight, delicious!!!
How do you adjust the recipe for shrimp as you mentioned?
Use 1 1/4 lbs of small peeled shrimp instead of the chicken pieces, then follow the rest of the recipe as directed, cooking the shrimp for 2-3 minutes per side.
can i use thighs
Yes that’s fine!