These beautiful stained glass cookies are buttery sugar cookies with a candy center. A holiday classic that tastes as good as it looks!
If you’ve never made stained glass window cookies before, this is the year you need to try. They’re unique, pretty and so very festive! Serve them along with other Christmas recipes such as Christmas sugar cookies, M&M cookies, microwave caramels and Christmas tree brownies.

I’m not going to lie, I was a little nervous when I put these stained glass cookies into the oven. Would they come out like the pretty pictures you see in magazines, or would they melt everywhere and be a Pinterest fail? Imagine my relief when I pulled the cookies out of the oven and found these beautiful little gems. If I can make picture perfect stained glass window cookies, so can you! This is a great project to do with the kids, my girls had so much fun making these with me.
Table of Contents
Stained Glass Cookies Ingredients
To make this recipe, you will need unsalted butter, granulated sugar, eggs, vanilla extract, salt, all purpose flour, coarse sparkling sugar and crushed hard candies.
How Do You Make Stained Glass Cookies?
Place the butter and sugar in the bowl of a mixer, and cream the ingredients together until they are light and fluffy. Add one egg at a time, and beat well after each egg does in. Next add the vanilla and salt. Slowly mix in the flour until you have a dough. Take the dough from the bowl and shape it into a disc. Chill the dough for at least one hour. Preheat the oven and line a baking sheet with parchment paper or a nonstick baking mat. Roll the dough into a rectangle, and use a cookie cutter to make shapes. Use a smaller cookie cutter of the same shape to cut windows out of each cookie.
Place the dough shapes on the cookie sheet. Press the sparkling sugar into the tops of the cookies, then chill the cookies. Remove the cookies from the fridge, then fill them with crushed candy. Bake until the cookies are golden brown and the candy is melted. Cool completely, then serve and enjoy.

Tips For The Perfect Cookies
- I used star shaped cookie cutters here because that’s what I had on hand, but you can use any holiday cookie cutters you like, as long as you have them in two different sizes so you can cut out your windows!
- You’ll want to separate the candies by color, then put them in a resealable bag and crush them with the flat end of a meat mallet, or a rolling pin. The candy should not be ground into a super fine powder, otherwise it might get over caramelized in the oven. You also don’t want huge chunks of candy, think coarse sand or small pebbles.
- You only need to fill the centers of the cookies about 2/3 of the way full with the candy, otherwise you run the risk of it overflowing onto the cookie. I use a toothpick to gently nudge the candy into each point of the star.
Quick Tip
These cookies keep at room temperature for about 3 days, but you should store them in a single layer or place parchment in between layers so that they don’t stick together.

Recipe FAQs
The candy will melt by itself in the oven as the cookies bake. It’s just important to make sure you don’t overfill each cookie window, and the candy should be crushed into coarse pebbles so it melts properly.
The dough for cut out cookies should be rolled to either 1/4 inch or 1/2 inch in thickness. For these stained glass cookies, I do 1/2 inch because I want the walls of the cookies to be a little thicker to contain all the melted candy.
FOLLOW ME

Flavor Variations
While these cookies are delicious as-is, you can customize some of the ingredients to suit your tastes.
- Dough: Feel free to add some other flavorings to the dough such as cinnamon, lemon zest, nutmeg, or extracts like almond extract or orange extract.
- Candy: No Jolly Ranchers on hand? This recipe will work with any hard candy such as Lifesavers, butterscotch candy or cinnamon discs.
- Sprinkles: Instead of using coarse sugar on the outside of the cookies, you can use colored sugar or non pareil sprinkles for a fun and festive look.
If you’re looking for an impressive treat to bring to a cookie exchange this year, these stained glass cookies can’t be beat!
More Holiday Cookie Recipes
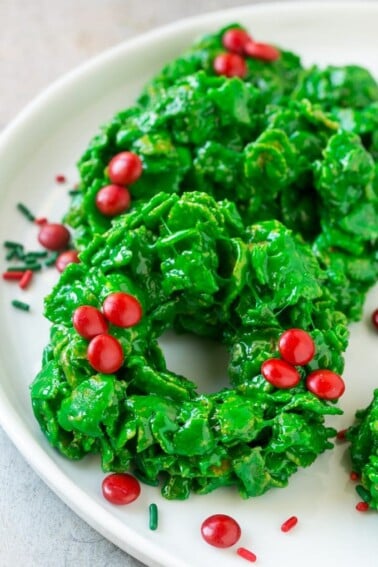
Christmas Wreath Cookies
15 mins
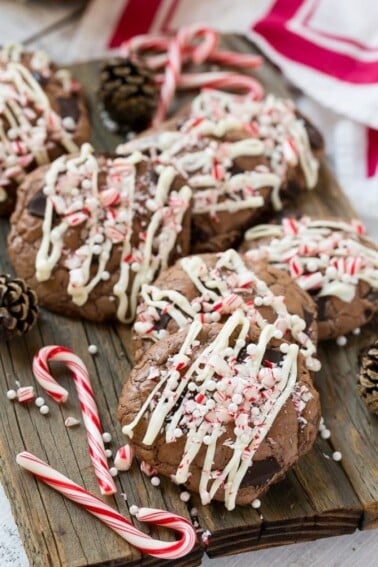
Peppermint Bark Cookies
35 mins
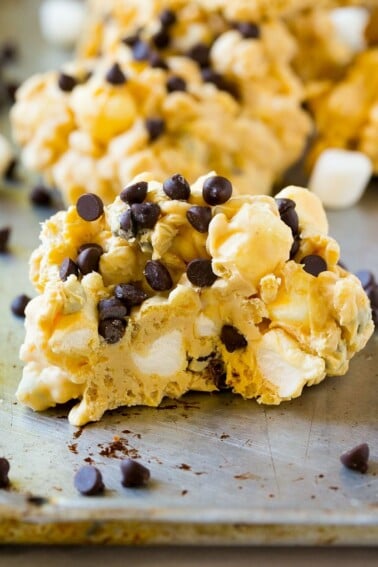
Avalanche Cookies (No Bake)
6 mins
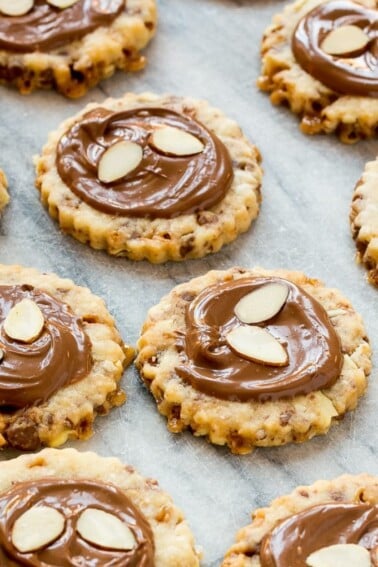
Almond Roca Cookies
30 mins

Chocolate Fudge Cookies
1 hr 30 mins
Stained Glass Cookies Video
Love This Recipe?
Please leave a 5-star 🌟🌟🌟🌟🌟 rating in the recipe card below & a review in the comments section further down the page.
Stained Glass Cookies

Ingredients
- 1 cup unsalted butter softened
- 1 cup granulated sugar
- 2 eggs
- 1 1/4 teaspoon vanilla extract
- 1/2 teaspoon salt
- 3 cups all purpose flour
- 2/3 cup coarse sparkling sugar
- 1/2 cup crushed hard candies Jolly Ranchers or Lifesavers work great
Instructions
- In the bowl of a mixer, beat the butter and sugar until smooth, about 2 minutes.
- Add the eggs one at a time, beating well after each addition.
- Add the vanilla and salt, then slowly mix in the flour until thoroughly combined.
- Remove the dough from the bowl. Place the dough on a large piece of plastic wrap and shape it into a disc. Wrap the plastic wrap around the dough and chill for at least 1 hour, or up to 1 day before you plan to bake your cookies.
- Preheat the oven to 350 degrees. Line a sheet pan with parchment paper or a nonstick baking mat.
- Divide the dough in half. Re-wrap one half of the dough and place it in the fridge. Roll the remaining dough into a 1/2 inch thick rectangle.
- Using a 4 inch star shaped cookie cutter, cut out as many shapes as you can from the dough. Place the stars 1 inch apart on the cookie sheet, and use a 2 inch star cookie cutter to cut out your windows.
- Re-roll the dough and repeat the process until you’ve filled your first baking sheet.
- Gently press sparkling sugar into the tops of the cookies.
- Place the pan of cookies in the fridge and chill for 20 minutes.
- Remove the cookies from the refrigerator. Fill each cookie 2/3 of the way full of crushed candy, using a toothpick to nudge the candy into small crevices.
- Bake for 10-12 minutes or until cookies are light golden brown and the candy has melted. Cool completely.
- Repeat the same process with the other half of the dough that you previously put in the refrigerator.
- Store covered in a single layer for up to 2 days.
Notes
- You’ll want to separate the candies by color, then put them in a resealable bag and crush them with the flat end of a meat mallet, or a rolling pin. The candy should not be ground into a super fine powder, otherwise it might get over caramelized in the oven. You also don’t want huge chunks of candy, think coarse sand or small pebbles.
- You only need to fill the centers of the cookies about 2/3 of the way full with the candy, otherwise you run the risk of it overflowing onto the cookie. I use a toothpick to gently nudge the candy into each point of the star.


Can you freeze the cookies after baking?
That should be fine! Just be aware the candy centers may be a bit sticky when thawed from the condensation.
Hi there won’t the candy get stuck to cooking sheets after baking
The recipe calls for lining the sheet pans with parchment paper or a nonstick baking mat, this prevents sticking.
Hi,
I have used Fox candies which is similar to Jolly Ranchers and find it too hard. Your substitute of butterscotch candy sounds good but what about the colour of the stained glass effect?
Another question: should cookies be baked twice, once without candy, and then second time with candy?
How long to wait to cool after you bake the cookies with candy? Like 1 hour?
They should firm up pretty quickly, I’d say 15-20 minutes.
Great recipe and easy to follow instructions. I live at high altitudes and adjusted the baking temperature and time to 375° for 12-14 minutes.
Hi! Awesome recipe, came out a treat! I did notice a fair amount of bleed on the back surface – any thoughts on why or how to stop this? The top surface looks perfect anyway so not too fussed!
You could try leaving a little empty border around the crushed candy center so that when it melts it will fill in the border rather than going under the cookie!
Our British candy is all bland and drab! Thanks for the reply, I look forward to trying them for my daughter’s birthday party x
hi, do you know how many packets of jolly ranchers i’ll need for these? i’m in the uk so will be buying them online as can’t find any suitably coloured candy here. thanks x
Any hard candy will work! I’d buy at least a pound, because sometimes the colors aren’t evenly distributed in the bags. For example, once I bought a bag and it only had like 3 green candies!
11/4 teaspoon vanilla extract?
what does that mean?
1 and 1/4 teaspoons
Can I cut out the cookies, freeze them & when needed defrost cookie cut outs & then fill centers with crushed candy & bake. Using for a cookiw walk.
Yes that should be fine!
Can I make these ahead and freeze them?
You can freeze them, just be aware that the candy might be a bit stickier when thawed.
Can I make this with sugar cookie dough (store bought)?
Store bought sugar cookie dough will puff up and spread, so your shapes won’t come out clean. You could buy a bag of dry sugar cookie mix and follow the directions for cut out cookies and that will work!
I make these but make two and once cool fill the hole with some edible stars and sprinkles then ice the two together it has a kind of snow globe effect 🙂
That sounds amazing I’ll have to try that next time!
Ok… here we go! So far these are living up to the post… chilled for 24 hours … at first, the dough felt like a rock, but an it was so easy to work with!!! Used Russell Stover candies…(sugarless) made them a little smaller than 1/2″ and just watched from the 8min mark…crossing my fingers they taste as good as they look!! Thank you…
Hope you enjoy them, thanks for reporting back!
These look pretty. Would be pretty with homemade jam too, sandwiched together.